Dentrix is a comprehensive dental practice management software developed by Henry Schein One, designed to streamline both the clinical and administrative operations of dental offices. Launched in 1989 as the first dental software for Microsoft Windows, Dentrix has since evolved into a leading solution in the dental industry.
Dentrix Charting: How To Chart (G7 version)
Step 1: Open the Patient Chart
- From the Dentrix main screen, click on Chart or press
Ctrl + T. - Select or search for the patient whose chart you want to update.
Step 2: Understand the Chart Layout
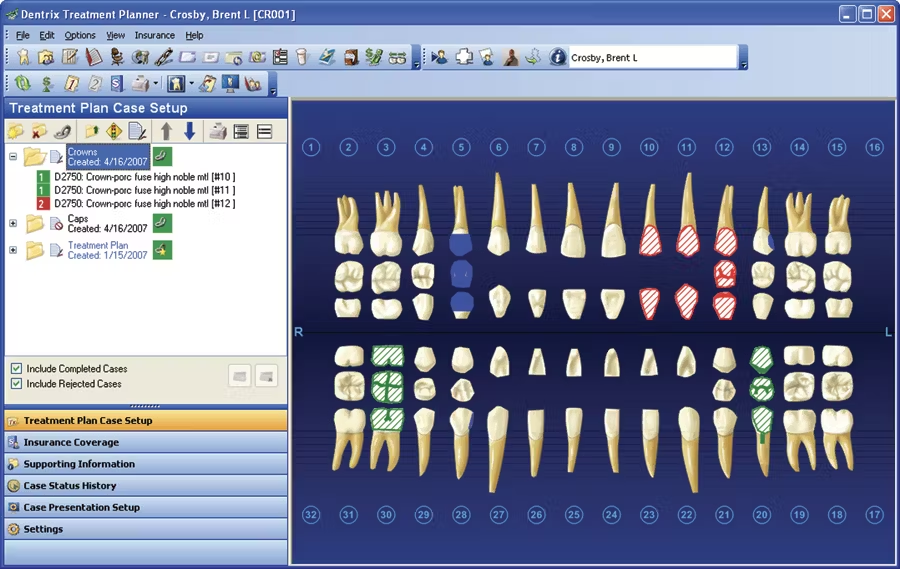
- The Odontogram shows the tooth diagram.
- Procedure buttons (right side) allow quick access to common treatments.
- The Progress Notes window (bottom) shows existing entries.
Step 3: Chart Existing Conditions (e.g., caries, missing teeth)
- Click on the tooth/teeth involved.
- From the top menu, go to “Chart” > “Existing Conditions”.
- Choose the appropriate condition (e.g., caries, missing, impacted).
- Fill in details like surfaces if prompted.
- Click OK to chart it.
📝 These will show in blue, indicating existing (not planned or completed) conditions.
Step 4: Chart a Proposed Treatment
- Select the affected tooth or teeth.
- Click the appropriate Procedure Button (e.g., filling, crown, extraction).
- OR: Go to “Edit > New Procedure”.
- In the procedure window, adjust:
- Tooth number(s)
- Surface (if applicable)
- Provider
- Choose Treatment Plan (not “Complete”) if it’s planned work.
- Click OK.
📝 These procedures will appear in red in the odontogram and in the Treatment Plan tab.
Step 5: Chart a Completed Procedure
- Select the tooth/teeth.
- Use the procedure button or manual entry.
- In the procedure window, mark it as “Completed” instead of planned.
- This posts it to the Ledger and shows in green in the odontogram.
Step 6: Use Progress Notes
- Located at the bottom, this tracks every entry.
- Use the checkboxes above the list to filter by status (e.g., Tx Plan, Completed, Existing).
- Double-click any line to edit.
🔍 Additional Tips:
- To undo a charting error, highlight the procedure and click “Delete” or right-click > “Delete Procedure”.
- To mark missing teeth, right-click the tooth > “Change Tooth Properties” > Check “Missing”.
- Customize procedure buttons via Setup > Procedure Buttons Setup.
Dentrix Billing
1. Posting Charges in the Ledger
The Ledger is where all patient charges, payments, and insurance claims are posted.
Steps:
- Go to Ledger (
Ctrl + L) and select a patient. - Click “New Charge” or double-click a procedure in the Chart and post it as Completed.
- The procedure automatically posts to the Ledger with the assigned provider and fee.
Tip: Completed procedures are billed; planned ones are not.
2. Posting Payments
A. Patient Payment:
- In the Ledger, click “Enter Payment”.
- Choose Payment Type (e.g., Cash, Credit, Check).
- Enter the amount and apply it to the appropriate procedures or leave as an unapplied credit.
B. Insurance Payment:
- Open the Insurance Claim (from Ledger or by double-clicking the claim).
- Click “Enter Payment”, and input:
- Amount paid
- Date
- Insurance carrier
- Provider
- Apply to procedures and click OK.
3. Creating and Sending Statements
A. Single Patient Statement:
- In the Ledger, click “Statement”.
- Choose:
- Billing type (e.g., walkout, mail, email)
- Date range
- Notes to include
- Click Preview or Send.
B. Batch Billing Statements (Monthly):
- Go to Office Manager > Reports > Billing.
- Set your filters:
- Due date range
- Billing types
- Minimum balance
- Choose Print or Send Electronically (if integrated).
- Click OK to generate statements.
4. Creating Insurance Claims
- In the Ledger, highlight completed procedures.
- Click “Create Insurance Claim”.
- Review claim info (provider, tooth number, procedures).
- Submit the claim (paper or e-claim depending on setup).
5. Running Billing Reports
- Go to Office Manager > Reports > Practice Analysis or Billing Reports.
- Choose the type of report (e.g., aging, accounts receivable).
- Filter by provider, date range, billing type.
Pro Tips:
- Use Billing Types to group patients by how they’re billed (e.g., cash, insurance, ortho).
- Check “Guarantor Notes” for special payment arrangements.
- Regularly run Aging Reports to follow up on overdue balances.
What can I do with Dentrix?
Patient Records Management: You can store patient demographics, medical history, treatment plans, insurance details, and contact information.
Appointment Scheduling: This software allows you to manage appointments, set reminders, and optimize the dental office’s calendar, reducing downtime and maximizing efficiency.
Billing and Invoicing: Dentrix handles the gruelling billing processes by handling invoicing, insurance claims, payment processing, and financial reporting, ensuring accuracy and compliance.
Clinical Charting: Dental charting can be completed in a minute, allowing you to accurately record and track treatment details, diagnoses, procedures, and patient progress.
Imaging Integration: This helps with imaging devices, allowing for the capture, storage, and retrieval of X-rays and other dental images directly into patient records.
Reporting and Analytics: A dental practice manager’s best friend, as it runs detailed reporting and analytics tools to track practice performance, financial metrics, and key performance indicators (KPIs).
Patient Communication: Dentrix charting also allows communication with patients through integrated tools for appointment reminders, follow-ups, and communication preferences.
Treatment Planning: This facilitates creating and managing treatment plans, including patient education materials and case presentations for better patient engagement.
Dentrix Availability
Dentrix is primarily available in the United States. For dental practices in other regions, including the Philippines, it’s advisable to contact Henry Schein One or authorized distributors to inquire about availability and support options.
For a visual overview of Dentrix’s capabilities, you might find the following video helpful: